

How To Hook Up Rodi Filter Under Kitchen Sink
Install a Reverse Osmosis H2o Filter
Updated: November. 22, 2019
If you need filtered water, a reverse osmosis system is a good solution
Install a reverse osmosis system under your kitchen sink to supply purified water. You tin can do it yourself in less than two hours.
You might also like: TBD
Contrary osmosis h2o filter benefits, costs and performance
If you buy lots of bottled or filtered h2o or y'all're worried about your tap water, a contrary-osmosis water filter can be a good investment. They can provide 10 or more gallons of drinking water a day. A reverse osmosis system costs from $150 to $300, plus $100 to $200 annually for replacement filters.
Reverse-osmosis filters remove many pollutants and chemicals, separating them from the h2o and and so flushing them into the drain line. The purified water is and so fed to the storage tank or the spout on the sink. Nonetheless, reverse-osmosis filters remove the minerals that give water its taste, then try a gallon (bachelor at well-nigh supermarkets) before buying a arrangement.
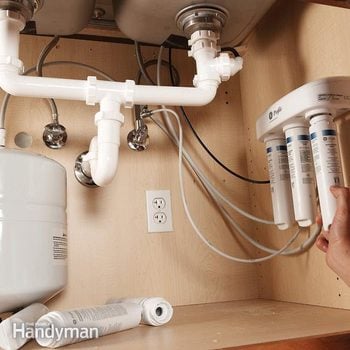
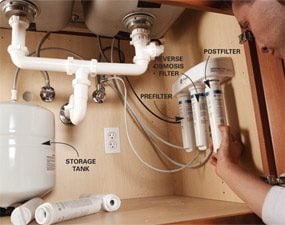
Install a reverse osmosis system
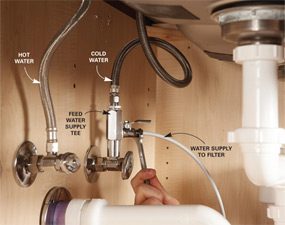
Photo 1: Mountain water supply feed
Push the plastic supply tube onto the inlet valve, so tighten the nut a half plow past hand tight.

Photo ii: Adhere the sink faucet
Feed the water supply line and the 2 waste product lines upward through the hole in the sink and through the gasket and faucet base, and then adhere them.

Photograph 3: Connect the drain line adapter
Install the drain line adapter just below the sink and above the belch from the disposer and/or dishwasher.
Photograph iv: Mount the storage tank and sanitize
Before using the system, sanitize it then fill up and drain it to rinse information technology make clean. Check all the fittings for leaks.
Kickoff, hang the filter assembly on the back or side wall of the sink base (or in the basement close to the sink location) at the elevation specified in the instructions. Plough off both the cold and the hot water shutoffs, and and then install (after the cold water shutoff) the tee or saddle valve included with the unit of measurement.
Cutting the color-coded h2o supply line then that it'southward above the cabinet base and won't go kinked. Spike the plastic tubing to the supply valve (Photo i).
Shorten the supply and waste lines to the faucet to eliminate excess tubing, only don't cut the larger black waste material line even so. Attach the lines to the fittings on the base of the faucet (Photo 2). The black waste lines feed through the base of operations of the faucet to keep them higher up possible sink backups, but they have no connectedness to the supply.
Fasten the faucet to the sink, then install the drain line adapter under the sink basket. Cut the waste line and then that information technology flows downhill with no loops, and so button information technology into the adapter (Photo 3).
Set the storage tank into place and install the final water line. Sterilize and fill the arrangement according to the manufacturer'southward instructions (Photo 4).
Recharge a opposite osmosis holding tank

Cheque the tank'southward empty force per unit area
Unscrew the protective cap and check the tank pressure. Inflate or debunk with a tire pump to reach the manufacturer's recommended pressure level (usually five to 7 psi).
If your reverse osmosis filtration system doesn't deliver equally much h2o as information technology did when information technology was new and yous've inverse the filters and membrane, the problem may be an undercharged or leaking property tank. The tank uses a traditional tire valve-mode stem that can lose air over time. When the air pressure drops, the bladder can't button out every bit much water.
Here's how to check the pressure. Get-go, y'all'll need a low-pressure tire gauge (one option is the Victor Tire Approximate Low Pressure 1 to 20 psi; $vi at amazon.com). You can't apply an ordinary tire gauge. Next, plough off the h2o supply valve to the filter organization and shut off the valve at the elevation of the belongings tank. Disconnect the tubing at the tank valve. Dump all the water out of the tank. Then check the air pressure level as shown above. Adjust to the recommended force per unit area. Then reinstall the tank and tubing and plough on the water.
Once the tank is filled, notation the filled pressure. Wait a few days and cheque the pressure again. If the pressure is the same, you lot're done. If the tank has lost pressure, effort replacing the valve core (available at machine parts stores). If the new core doesn't solve the problem, replace the tank.
Required Tools for this Project
Have the necessary tools for this DIY project lined up earlier yous start—you'll save time and frustration.
Required Materials for this Project
Avoid concluding-infinitesimal shopping trips by having all your materials set alee of time. Hither'due south a list.
Originally Published: November 22, 2019

How To Hook Up Rodi Filter Under Kitchen Sink,
Source: https://www.familyhandyman.com/project/install-a-reverse-osmosis-water-filter/
Posted by: jakubowskisuremposelve.blogspot.com
0 Response to "How To Hook Up Rodi Filter Under Kitchen Sink"
Post a Comment